
Floating shelves are a fantastic way to add storage and style to any room, and the best part? You can totally build them yourself! Whether you want a sleek modern look or a rustic vibe, DIY floating shelves are customizable to fit your space, and this guide will walk you through every step. Don’t worry if you’re new to DIY—this tutorial is straightforward and perfect for anyone, even if you’ve never picked up a tool before! So let’s start learning how to build shelves.
What Materials Are Needed for DIY Floating Shelves?
First, let’s go over the materials for your DIY floating shelves. You can adjust these depending on how big or small you want your shelves to be, but the basic supplies are the same:
Here’s what you’ll need to build 4 DIY floating shelves:
|
Supply |
Dimensions | Quantity for 4 Shelves |
Purpose |
|
1×10 Pine Board |
1″ x 10″ x 8′ | 4 | Top piece of the shelf (one per shelf) |
|
2×3 Pine Board |
2″ x 3″ x 8′ | 4 | Back frame support (one per shelf) |
| 1/4″ Hardwood
Plywood |
4′ x 4′ sheet |
1 (may need to buy additional) | Bottom piece of the shelf (cut into strips) |
|
1×4 Pine Board |
1″ x 4″ x 6′ |
4 |
Side and front trim pieces |
Hardware:
- 1 1/4″ brad nails
- 2.5″ pocket hole screws
- 3.5″ wood screws
Tools:
- Miter saw
- Jig (optional but handy)
- Drill
- Sand Paper
- Stud finder
Now, don’t let that list intimidate you! These are all basic materials you can find at Home Depot or any hardware store. Most of the time, they can even cut the wood to size for you.
8 Steps To Making DIY Floating Shelves
Although making DIY floating shelves seems next to impossible because you don’t know where to start. Moreover, most of the tutorials provide information on only a specific size and this makes it confusing to create a floating shelf that goes well with your space. Worry not, just follow these 8 steps that will help you customize your DIY floating shelves as per your need. Let’s start building your customized DIY floating shelves.
Step 1: Cutting the Lumber (For 32” Four Shelves)
Okay, let’s start with the wood for DIY floating shelves. Depending on how wide and long you want your shelf, you’ll cut the boards accordingly.
Note: The reference size here for DIY Floating Shelf is 32” . Now look at what you will need.
- Cut the Back Frames: First of all, with the help of a saw, cut four pieces of 2×3 boards each of 32 inches in length. These will be used in the formation of the vertical support for your shelves.
Cut the Top and Bottom Pieces: Then, cut four pieces of 1×10 boards to 32 inches each. These will be the top and bottom of your shelves.
- Cut the Bottom Panels: Last, cut four pieces of 1/4-inch plywood into 32 inches x 7.75 inches. These will form the base of your shelves, the lower panels of the shelf as it were.
- Cut the Brackets: Then use a spare 2×3 board to cut twelve pieces of 7”. 75 inches each. These will be used as brackets to hold the shelves since they are within a bracket form.
Customization Tip: Now the above is just a reference example. You can customize the floating shelves according to your space. All you need is a few mathematical adjustment. But worry not, we are here to help.
Here’s a table to demonstrate how you can customize your floating shelves.
| DIY Floating Shelves (4 Shelves) | |||||
|
Shelf Width |
Shelf Depth | Frame Length (Cut 2×3 board) | Bracket Length | Bracket Quantity |
Customization Tip |
|
24″ |
7.75″ | 24″ | 7.75″ | 3 |
|
|
32″ |
7.75″ | 32″ | 7.75″ | 3 | |
| 36″ | 7.75″ | 36″ | 7.75″ |
4 |
|
| 48″ | 7.75″ | 48″ | 7.75″ |
5 |
|
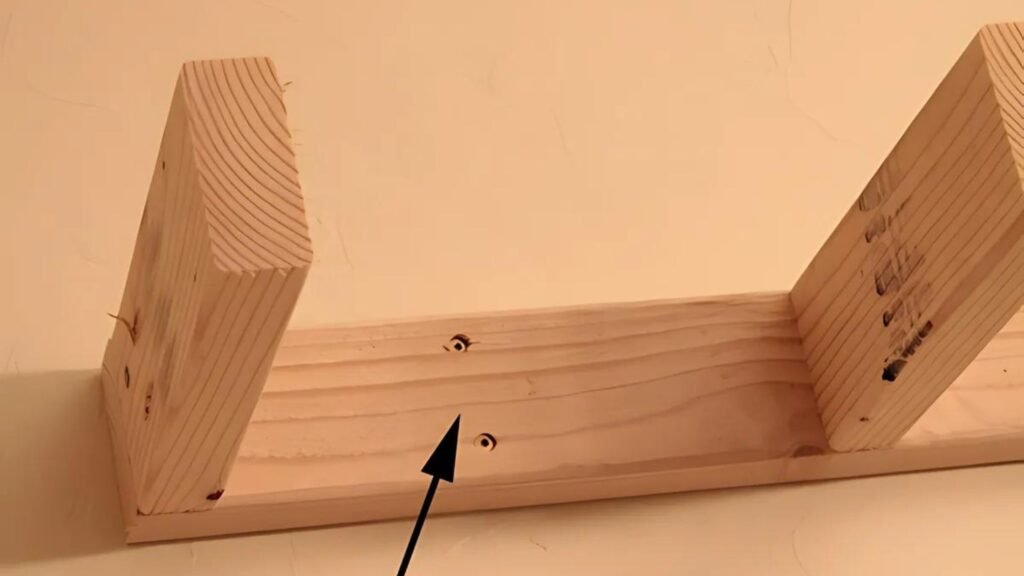
Step 2: Punching Pocket Holes
Next, we’re going to make some pocket holes. What are pocket holes? Basically, they’re angled holes that make your wood joints super strong. You can easily drill pocket holes using a jig. However, if you don’t have one, don’t stress—it’s not essential, but it makes the job way easier. Or else a hammer can also do.
Use the jig to add pocket holes to one end of each bracket. Then, these will be attached to the floating shelf frame in the next step.
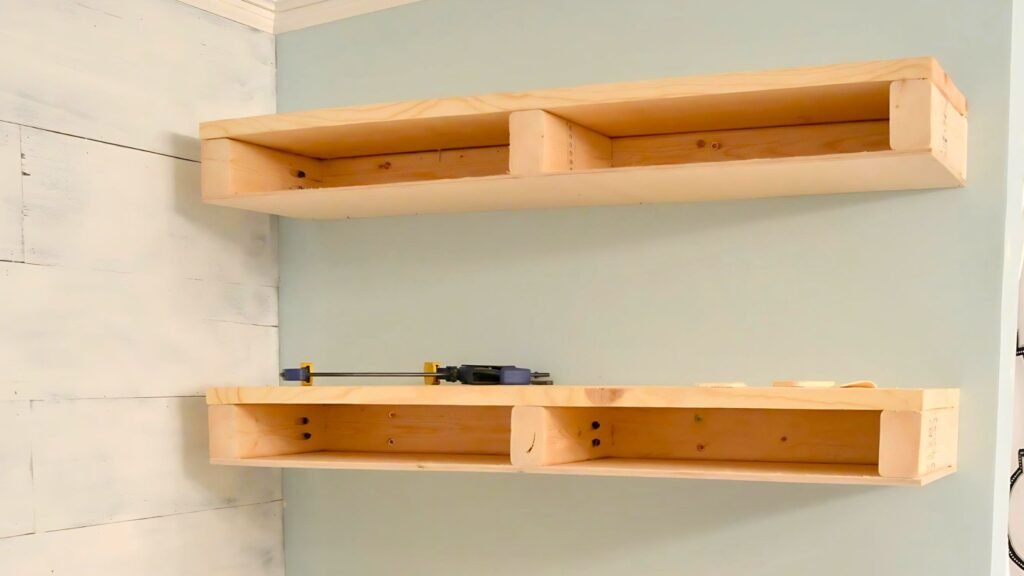
Step 3: Connect The Brackets To The Frame
Once the pocket holes are ready, it’s time to attach the brackets to the frame. This is where your 2.5″ pocket hole screws come in. Add a little wood glue to the end of each bracket before screwing them into place to make the shelf extra sturdy.
Pro Tip: For bigger shelves, make sure you add extra brackets. Again, keeping them 12-15″ apart will ensure your shelf can handle whatever you put on it (books, decor, etc.).
Step 4: Mark Studs On Frame and Install Them on the Wall
Now it’s time to attach the frame to the wall.
- First, grab your stud finder and locate the studs (the sturdy parts inside your wall that you want to screw into).
- Mark where the studs are, then pre-drill holes in your frame where those studs line up.
- This is an important step, especially for larger shelves. If your shelf isn’t attached to studs, it can sag or even fall off the wall—nobody wants that!
- Finally, attach your frame to the wall. Use 3.5″ wood screws to secure the frame to the wall.
Step 5: Add the Top and Bottom Pieces
Once the frame is up on the wall, it’s time to start making it look like a real DIY floating shelves.
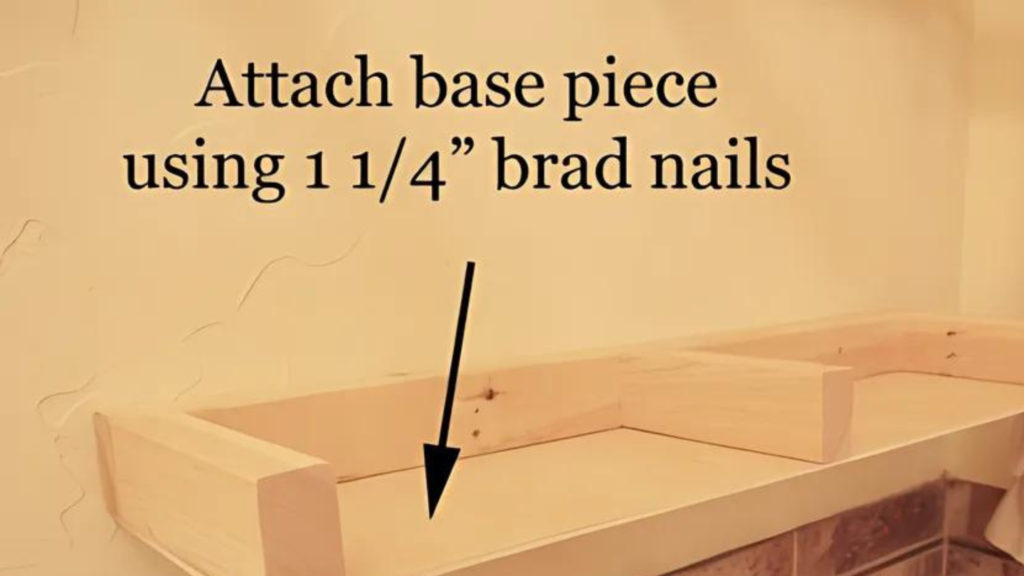
- First, grab your 1/4″ plywood (the bottom piece) and 1×10 board (the top piece). Both should be cut to the length and depth of your shelf.
- Using wood glue and 1 1/4″ brad nails, attach the plywood to the bottom of the frame and the 1×10 board to the top.
Tip: This step is the same no matter the size of your shelf—just cut the boards to match whatever depth and length you’ve chosen.
Step 6: Complete the Look by Trimming
Now it’s time to make your shelf look polished! The trim goes around the edges of the shelf, hiding any rough parts and giving it a finished look.
- Side trim: Measure the depth of your shelf (for example, if it’s 9.25″ deep, cut your side trim pieces to match).
- Front trim: Measure the width of your shelf and cut a piece of 1×4 board for the front. Attach all the trim pieces using wood glue and brad nails.
The process is the same no matter what DIY floating shelves you’re building!
Step 7: Polishing the Shelf
You’re almost done making your DIY floating shelves ! After everything is assembled, it’s time to smooth out the edges and finish your shelf:
- Sanding: Use 120-grit sandpaper to smooth out any rough edges, especially around the trim.
- Staining or painting: Stain the wood if you want a rustic look, or paint it for a modern vibe. Either way, make sure to let everything dry thoroughly before adding anything to the shelf. For a cool, vintage look, you can even distress the edges with your sander to give the shelf a bit of character.
Step 8: Customizing Your DIY Floating Shelves
The beauty of this tutorial is that you can adjust the size to fit whatever space you have. Here are some ideas:
- For longer shelves (e.g., 40″ or 60″), just cut the frame and top pieces to the length you want. Add more brackets for support, and make sure you hit multiple studs when mounting.
- In the case of deeper shelves (e.g., 12″ or 14″ deep), use wider boards for the top and plywood for the bottom. You’ll also need deeper side trim pieces to match.
- Next, if you are making smaller shelves (e.g., 20-24″ wide), cut everything shorter and use fewer brackets. These are great for kitchens or bathrooms where you just need a bit of extra storage.
Things To Keep In Mind While Customizing Floating Shelves
To craft floating shelves of any size, just keep the following in mind:
- Firstly, you should remember that as the shelf gets wider, you’ll need more brackets to keep everything stable. For instance, a 24″ shelf needs three brackets, but once you go up to 48″, you’ll want to add a fourth bracket for extra support.
- Secondly, when spacing the brackets, keep them about 12″ apart from each other. This is important for even support. This is true for shelves longer than 40″ to prevent sagging and keep the shelf sturdy.
- Although the bracket length stays the same at around 7.75″, you’ll still get the extra strength by adding more brackets rather than changing the size of them.
- To figure out the frame length just match it to the shelf width. So, if you’re building a 36″ shelf, you’ll cut the frame piece at 36″. This makes customizing the shelf super straightforward.
- By following these tips, you can easily build shelves that stay sturdy and balanced, no matter the size!
Common Mistakes to Avoid While Making DIY Floating Shelves
Before you grab your tools and start making your DIY floating shelves, here are a few tips to keep in mind:
- Always attach frames to studs: Especially for longer shelves, make sure your frame is secured to studs so it doesn’t sag or fall over time.
- Check for level: Nobody wants crooked shelves! Use a level before securing the frame to the wall.
- Don’t overload: Even though your shelves are sturdy, don’t overload them with heavy items. Keep in mind that large shelves may hold more, but still be mindful of the weight.
Conclusion
To sum up, this step-by-step guide to building your very own DIY floating shelves is surely a savior. Whether you’re looking to add a large, decorative shelf in your living room or a small, functional one in the kitchen, these easy steps will guide you through the process. Additionally, you don’t have to worry if this tutorial suits your needs. Yes, indeed, you can easily customize the size, finish, and style to match your home, and you’ll have stunning DIY floating shelves in no time.
FAQ
1. How deep should my floating shelves be?
Most floating shelves are 8-12 inches deep. Adjust based on what you plan to store or display.
2. In how much time can I make DIY floating shelves?
Floating shelves can be as long as you need. For lengths over 48 inches, add extra brackets for support.
3. What type of wood is best for DIY floating shelves?
Pine and plywood are popular choices due to their affordability and ease of use.