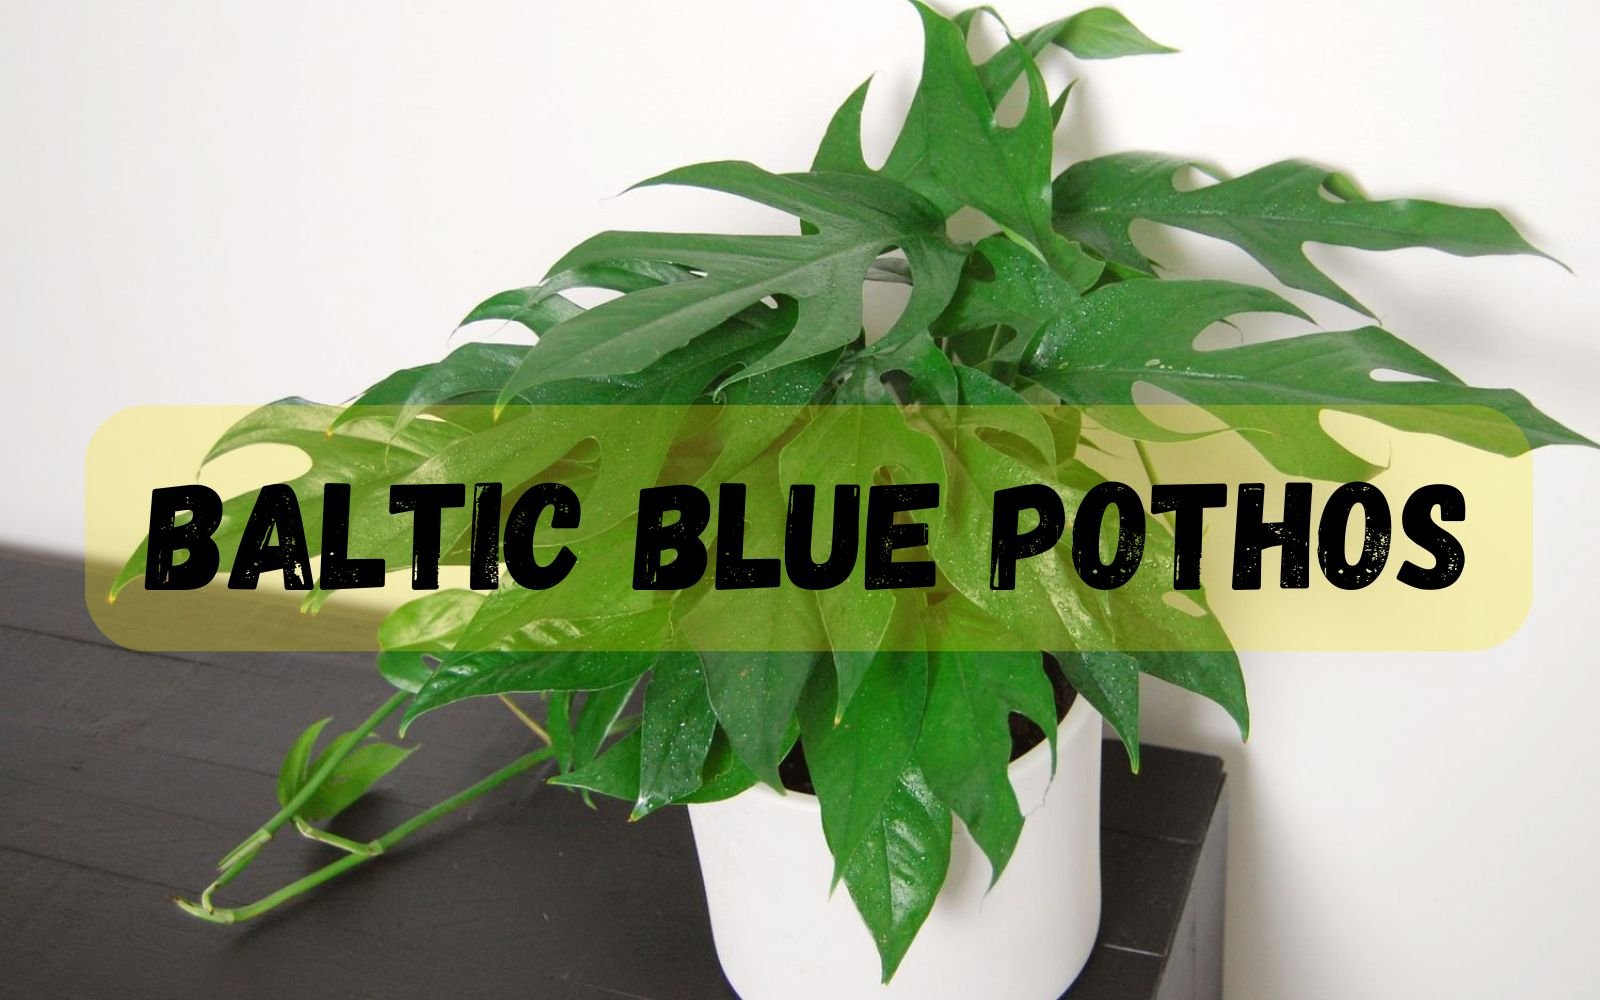
The Blue Pothos is a gorgeous houseplant that is loved for its deep blue-green leaves and easy care. This vining plant is popular for its aesthetic beauty because it develops unique, split leaves, also known as fenestrations, as it grows. Not only is it beautiful, but it also helps clean the air in your home. Though this plant is a low-maintenance plant, if not taken proper care, it will not survive. So let’s check out Baltic Blue Pothos light and temperature needs along with other requirements to help it thrive properly.
Table of Contents
ToggleBaltic Blue Pothos Care & Growing Conditions
To help your Pothos plant flourish, you must meet its basic growing & caring conditions . Let’s dive into the basic requirements that this plant needs to thrive.
1. Light
As we all know, light is one of the most important factors for the healthy growth of any plant. Plus, every plant has a different light requirement. Here’s how to provide the right amount of light for your Baltic Blue Pothos.
- Lit It Right: To begin with, this plant loves medium to bright indirect light.
- Avoid Low Light: Although it can survive in low light, it won’t grow as quickly, and its leaves might not develop those pretty splits.
- No Direct Light: Further, you must not keep it in direct sunlight, as it can burn its delicate leaves.
Once you’ve found the right lighting, it’s time to consider what the perfect soil needs for your plant.
2. Soil
Providing the right soil mix is important as it will ensure that your Baltic Blue gets the right nutrients and drainage it needs. Thus, the soil you use plays a significant role in your plant’s overall health. Let’s look at the best soil mix for a thriving Pothos plant
- Soil Type: For the best results, use a well-draining soil mix.
- Right Mix: A great mix includes indoor potting soil, perlite, and orchid bark to keep the roots both happy and healthy.
After selecting the appropriate soil, let’s now focus on the watering routine.
3. Watering
Watering your plant the right way can prevent many problems in the future, like root rot. Here’s how to properly water it.
- When To Water: First and foremost, let the soil dry out almost completely before you water it again. Next, avoid overwatering, as it can lead to root rot.
- How To Know It Needs Water: As a rule of thumb, check the top 2 inches of soil; if it’s dry, then it’s time to water.
After the solid watering routine is in place, next check the temperature needs.
4. Temperature and Humidity
If you want your plant to thrive well, then make sure to maintain a stable environment. This includes the right temperature and humidity conditions. Here’s the scoop:
- Ideal Temperature: Firstly, keep your plant in a room where the temperature stays above 55°F (13°C).
- Humidity Needs: Additionally, try to maintain an average to slightly higher humidity (around 60%). So, if your home is on the dryer side, then you can either use a humidifier or place the plant on a tray filled with water and pebbles.
Moving forward, once you get the ideal environment set up, the next step is to focus on fertilizing your plant for its enhanced growth.
5. Fertilizer
Regular fertilizing your plant will keep it vibrant and ensure lush growth. Let’s see how and when to feed your plant.
- Feed it well in the growing season: Firstly, fertilize it during the spring and summer seasons. However, feed it only once a month with diluted liquid fertilizer.
- When Not To Feed: On the other hand, skip fertilizing it in the fall and winter seasons. The reason behind this is that during these seasons, the plant isn’t growing actively.
With the growing needs addressed, now let’s move on to planting and repotting.
6. Planting and Repotting
Most often, people ignore the fact that choosing the right pot as well as repotting are essential for a healthy plant. The right proper planting and repotting practices ensure that your plant stays healthy as it matures. Here’s how to pot them right:
- Choosing the Right Pot: To start, use a pot with drainage holes to prevent water from sitting at the bottom, which could rot the roots.
- Repot Once It Outgrows: When your plant outgrows its current pot, it’s time to repot it otherwise, it will lead to stunted growth. Let’s see when and how to repot your Baltic Blue Pothos.
-
- Repot it every 1-2 years or when the plant outgrows its pot.
- Be sure to choose a pot that’s only slightly larger (1-2 inches bigger) to avoid overwhelming the roots.
Pro Tip: The best time for repotting your Pothos is during spring or summer.
Is Pruning & Support Needed To Grow Baltic Blue Pothos?
Pruning and using a supporter is the best way to keep your plant healthy and lush. Let’s see how to do it effectively.
Pruning Techniques
Pruning will not only maintain your plant’s shape but also promote its growth. Here’s how to prune your Baltic Blue Pothos Plant.
- Trim it back: First, make a point to trim your plant regularly.
- Remove Dead Leaves: Secondly, remove any yellow or damaged leaves to keep the plant healthy and visually appealing.
Supporting Growth
In addition to pruning, you must also provide the plant with structural support. This is because Pothos is a vine plant and providing it with support will naturally encourage healthier and larger leaves.
- Let it climb: Use a moss pole or trellis to help the plant climb.
- Next, tie the stems loosely with soft ties to guide them along the support without causing any damage to the plant.
How To Grow In Water?
Surprisingly, you can skip growing Baltic Blue Pothos in soil and instead grow it in water. Also, growing it in water is super easy. Here’s how you can do it:
- Pick Healthy Cuttings: First, grab some clean, sharp scissors or pruning shears and cut a healthy stem from a mature Blue Pothos plant. Also, make sure each cutting has at least 2-3 nodes (those little bumps where leaves and roots pop out).
- Prep the Cuttings: Next, strip off the leaves near the cut end to expose the nodes. This is the point where the roots will sprout.
- Get the Right Water: Remember to use filtered or rainwater and avoid tap water, as it can have chemicals that might hurt your plant.
- Put the Cuttings in Water: Now dunk the nodes in the water, but keep the leaves above the surface so they don’t rot.
- Give It Enough Light: Now set the container in a spot with medium to bright indirect light. Also avoid direct sunlight, as it can make algae grow in the water and harm the plant.
- Watch for Roots: After a few weeks, you will see that roots have started to grow from the nodes. Now if you wish to move it to the soil, then wait until the roots are at least one inch long.
Pro Tip: Change the water every week to keep it clean and oxygenated. This will help your plant stay healthy and prevent the growth of bacteria in the soil.
Common Problems and Solutions
Growing this plant is pretty easy, but it can run into a few hiccups. Check out the Baltic Blue Pothos common problems and how to fix them fast:
- Pests: Sometimes, little critters like spider mites, thrips, or mealybugs might show up. So, keep an eye on your plant, and if you spot any pests, just hit them with some insecticidal soap or neem oil.
- Yellow Leaves: This usually happens if the plant is getting too much or too little water or not enough light. Just tweak your care routine a bit to fix it.
- No Split Leaves: This is often because your plant isn’t getting enough light. Try moving it to a brighter spot so those split leaves can grow.
Conclusion
The Baltic Blue Pothos plant is a stunning, low-maintenance plant that can bring life to any home. However, to grow Blue Pothos, you must take care that all the plant needs are met properly. Also, by following the simple care tips given above, you’ll enjoy its lush, split leaves year-round while adding beauty and clean air to your space.
FAQ
1. Are Baltic Blue Pothos toxic to pets?
Yes, Baltic Blue Pothos is mildly toxic to pets if ingested. Keep it out of reach of curious animals to avoid any health issues.
2. How can I enhance the color of my Blue Pothos?
To enhance the color, provide bright, indirect light and avoid placing the plant in direct sunlight, which can scorch the leaves and affect coloration.
3. How does one identify nutrient deficiencies in Blue Pothos?
Just look at the leaves; if they are yellow, it indicates nitrogen deficiency, while browning leaf edges can signal potassium deficiency. You can adjust your fertilizer accordingly to address these issues.


